Friday, October 12, 2018

STEAM Shop

Part of my job this year is to run the STEAM (Science Technology Engineering Art Mathematics) Shop at an elementary school on Mondays and Tuesdays. During September and October, I have been working with 1st and 2nd graders. I will work with 3rd, 4th, and 5th graders in November and December. My students come in to my room in small groups throughout the day. In two months, I should be able to see all of the students in the grade levels that are coming to me at that time.
I decided to theme the STEAM activities for the 1st and 2nd graders around nursery rhymes. I have this set of cards by Modern Publishing that I bought when Boogs was only a year old. I know, I am a bit of a pack rat.

When I tell my students they are going to be working on Science Technology Engineering Art and Math activities based on Humpty Dumpty and Hey Diddle Diddle nursery rhymes, they are in disbelief. I love hearing their comments - No way! Those rhymes are for babies!    

First Grade: Our science focus for Humpty Dumpty is magnets.  At the beginning of each group's time, we explore magnets, discuss the terms repel and attract, discuss the types of metals that are magnetic, and then the students get one minute to walk the room to see what things in the room their magnets are attracted to.

Then, I take the students over to our stations, explain the challenges, and let them experiment and explore.  At the Train Humpty Dumpty to Sit station, each student gets two "pieces of wall" blocks. One block has a magnet glued on top and the other does not. They also each have a very small, but strong magnet. There is a container of pinto beans, a bag of paper strips, markers, tape, and scissors.
The students choose an egg to create their own Humpty Dumpty. They find a way to make their Humpty sit on the wall.
Some students figure out that putting beans inside the egg will help it balance.
This student used the paper strips to make a small stand for Humpty Dumpty.
Some students add arms and legs to provide balance. Some students figure out that putting the small magnet inside their egg will make their Humpty Dumpty attach to the block with the magnet. I love listening to their discussions about how to make it work. They are so excited when their own Humpty Dumpty is able to sit on a wall.
At the Build A Wall For Humtpy Dumpty station, students use their engineering and math skills to predict, build, and measure a wall for Humpty Dumpty. There are five bins of material to use and they must use at least two different kinds of materials in their wall. The materials are things I had available to use - base ten blocks, Jenga blocks, craft sticks, and small communion cups someone donated to the class. The students predict how tall of a wall they can build before they get started.
I encourage them to frequently stop and measure their wall in case it falls.
There are two how-to-measure posters to help the students remember to place their ruler with the zero end on the ground. I have meter and yard sticks so they can measure in centimeters or inches.
It is interesting to see all of the different ways the students make their walls. Sometimes their plan does not work out. FAIL stands for first attempt in learning.
The students get excited about what they are building and cheer on their classmates to make taller and taller walls.

After clean up time, we quickly debrief. The students help me figure out if we used all parts of  STEAM for Humpty Dumpty. S-magnets, T-students use iPhone and iPad to take pictures of their work, E-building the wall, A-creating and decorating Humpty Dumpty egg, M-measurement. We give ourselves a big pat on the back for making STEAM work with the Humpty Dumpty nursery rhyme. The students are very excited that they get to take home the Humpty Dumpty they made in the STEAM Shop.

Second Grade: Our science focus for Hey Diddle Diddle is phases of the moon. At the beginning of each group's time we discuss the phases of the moon - new, crescent, quarter, gibbous, full. Then I take them over to the two stations that focus on the phases of the moon.
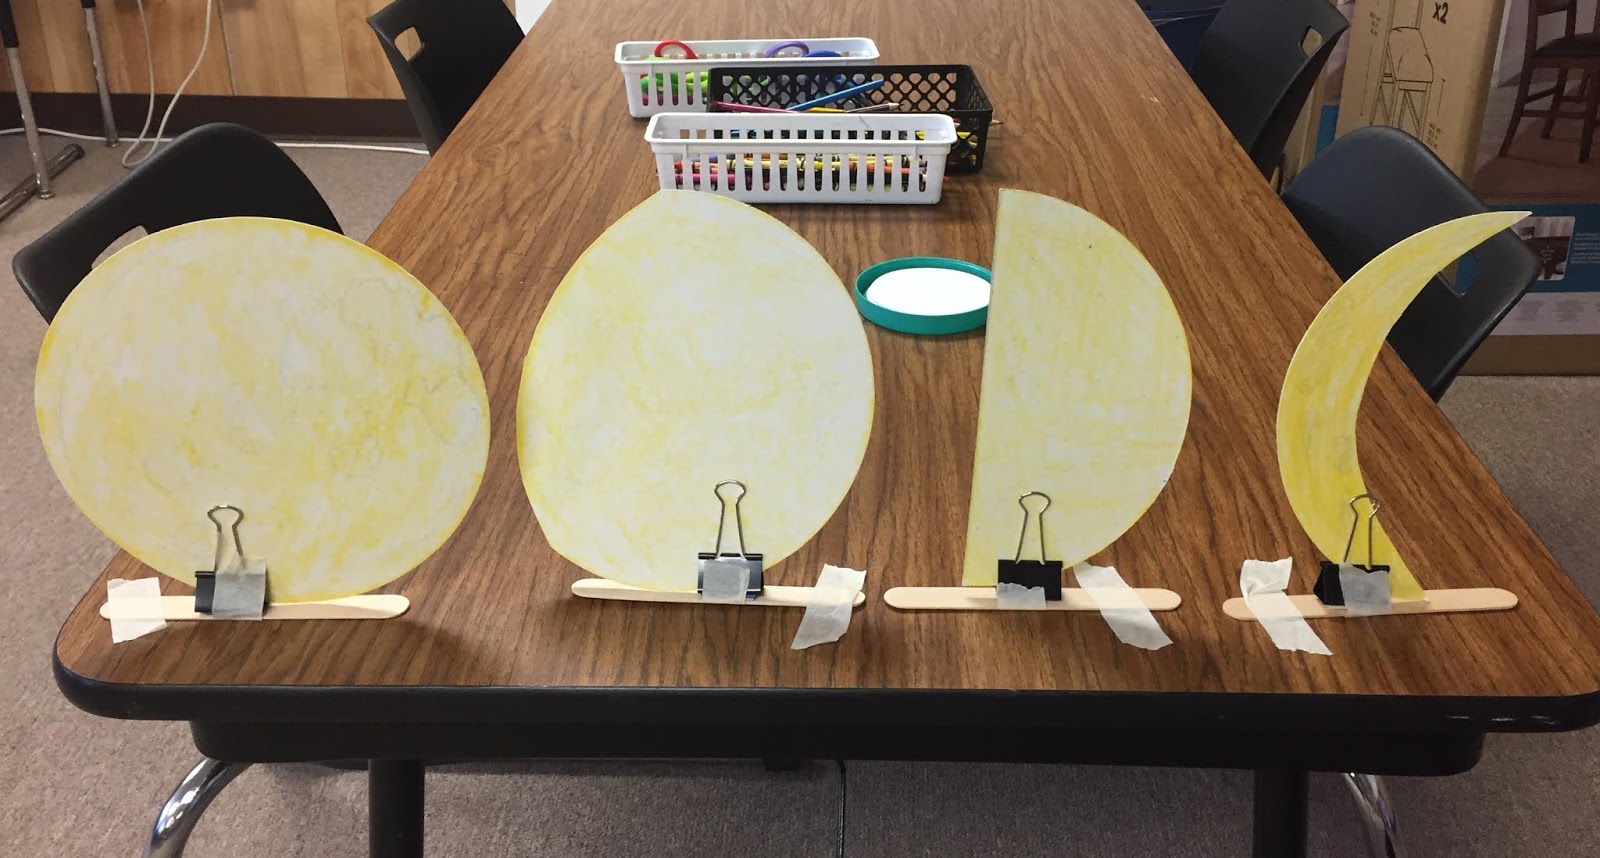
The first station asks the students to decide which phase of the moon they want their own cow to jump over. I have paper circles on the table for students to use as a starting point. They use the poster to help them decide what their moon will look like. There are crayons, colored pencils, pencils, and scissors on the table.
The computer station has a quick moon phase matching game. The students can pick how many matches they want to attempt, from 2 to 8. HERE is the link.
Helping the cow jump over the moon with a catapult has been the students' favorite station.

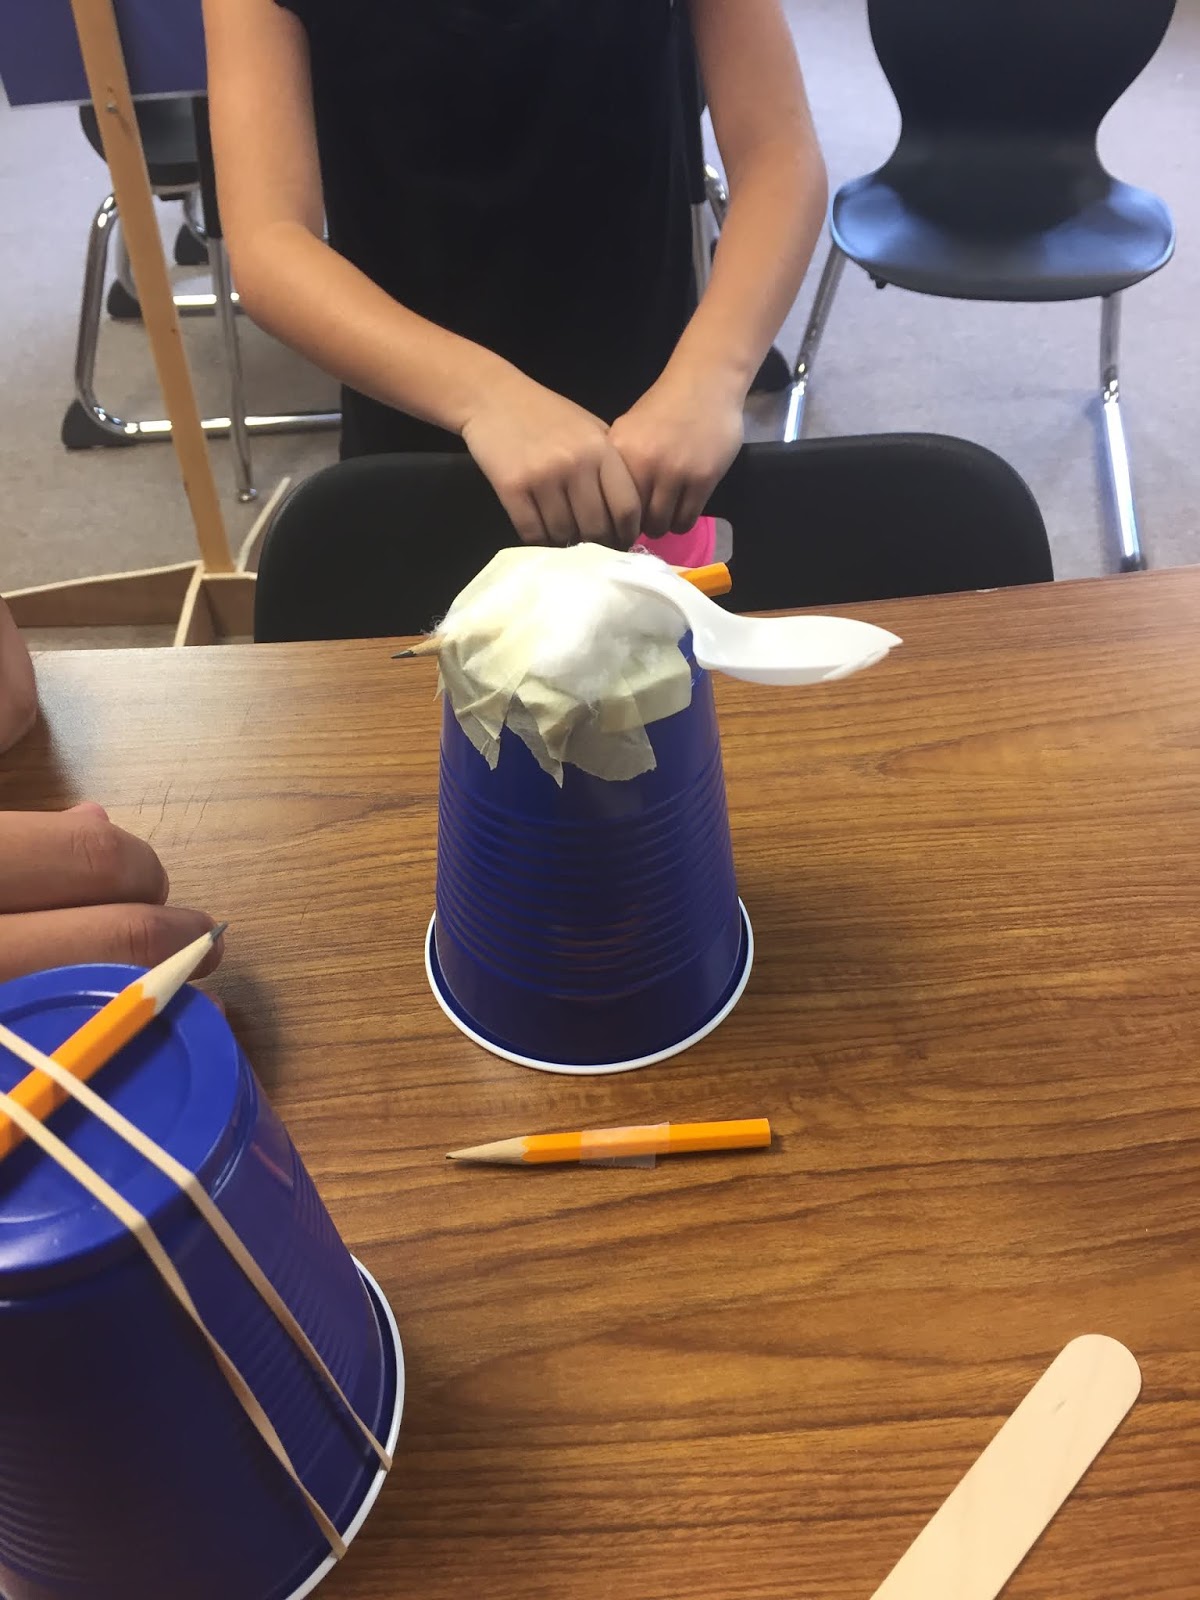
I make sure to tell the students about our corral of cows (cotton balls). The students use the available materials any way that they want to make a catapult. I have pictures of 8 different catapults and a book about catapults for inspiration. The materials are: craft sticks, golf pencils, rubber bands, water bottle lids, spoons, cups, masking tape, and binder clips. I have a hot glue gun that only I can use to glue things together for them.
The students make their catapult, launch a cow, measure the cow's jumping distance, and launch again to see if they can beat that distance. If they have extra time before our class ends, they can design a second catapult and compare its performance to their first catapult. I tell my students they will only be able to take home one catapult, they will have to use critical thinking skills to determine the criteria for choosing which catapult to take home. The rejected catapult must be taken apart so that my next group can reuse the supplies.
I love looking at the variety of their designs. Some are simple, two rubber bands holding a spoon to a cup. Some are more complex using many, many more materials.
I'm very glad we are in a portable building away from other classes when the cows are launched. The noise volume and excitement in the room gets very high. I taped down four phases of the moon in our launch pad area. The students sit behind the start line and launch their cows. They help each other figure out how far their cows jumped using yard sticks and meter sticks. Some catapults require adjustments in the angle of their levers. We discuss force and motion while they are making and testing their catapults.
This student decided to hot glue her full moon phase to the end of her catapult so that her cow jumps over the moon every time she launches it.
After clean-up time, we debrief. The students help me figure out if we used all parts of  STEAM for Hey Diddle Diddle. S-moon phases/force/motion, T-moon phase matching game on computer, E-building catapults, A-creating their own phase of the moon, M-measurement/angles/comparing distances. We give ourselves a big pat on the back for making STEAM work with the Hey Diddle Diddle nursery rhyme. Each student takes home one cow, one catapult, and one moon phase.

Early finishers are able to help others or work at the felt board. I have a large set of felt nursery rhymes I purchased when my 12-year-old was a toddler. I put the pieces for Humpty Dumpty, Hey Diddle Diddle, and Jack & Jill in a bowl for the kids to sort onto the correct story back drop. This activity also encourages re-reading of the nursery rhymes for fluency.
I don't know who has more fun, me or my students. I have two more weeks to decide what activities to do and to gather supplies for the 3rd, 4th, and 5th graders coming to STEAM Shop in November. I better get to work.

This post is linked to:

http://craftymomsshare.blogspot.com/search/label/Sharing%20Saturday

Sunday, October 7, 2018

Where did September go?

September passed by in a flash. This is the first year our local pool offered diving board classes after summer ended. Boogs signed up for September and October classes. He looked forward to spending two hours every Wednesday on the diving board. They even had classes in the pouring rain (no thunder or lightning). Unfortunately, the instructor had to move to Arkansas the first week of October so the October classes were cancelled.

The back dive off the high dive is something I would never attempt but Boogs was ready to tackle it.
 He especially enjoyed the last ten minutes of the class because that was free jump time.
 Boogs has really improved his form.
Boogs started working on learning an inverted dive. I was nervous that he would hit his head on the diving board.

September 23rd was Austin Museum Day. All of the local museums were open free of charge. Many of them had special exhibits or activities geared towards families. Boog and I went to the LBJ Library and Museum.
There was a special area set up in the parking lot about space. We got to stand in a partial spacesuit.

Boogs touched the small piece of moon rock on display. There was a video history presentation about space travel.
 Then we went inside the museum.
These phone booths are downstairs near the restrooms. I remember when they used to work. Now they are just for show.
Boogs liked the interactive display about the decisions and information LBJ had available to him during the Vietnam War. The touch screen allowed you to access and read the various reports on LBJ's desk. It asked you to decide what you would do then it told you what decisions LBJ actually made.
 We explored the library for quite a while. Boogs has outgrown the kids crafts and special activities.
I remember going to the LBJ Library with my family when I was a kid. We used to roll down the big hill to the fountain. Boogs did not want to get grass stains on his shirt, so he just ran down them a few times.
 He is pretty fast. I thought about running down the hill with him. But I didn't.
My brother, sister, and I used to dare each other to jump in the fountain. We never did it, but we liked to dare each other to try it. If you stand anywhere close to the fountain you will get misted with water.
 The pathways and trees near the library offer plenty of shady rest spots.
 Boogs took this picture of me before he climbed that tree.
We had so much rain in September that we did not spend a lot of time outside.  Boogs did go deer hunting with his dad the last weekend of September. He shot his first deer on the first shot he took. My husband is looking forward to eating some venison chili.


Fortlandia

I took Boogs and a friend, W, to Fortlandia at the Lady Bird Johnson Wildflower Center yesterday. The Wildflower Center is about 30 minutes from our house. The forecast said there was a 40% chance of rain, but we took our chances and went. Halfway there it started pouring rain with lightning and thunder. Luckily, the rain and lightning stopped by the time we reached the parking lot. We still heard a lot of thunder when we started our Fortlandia adventure. Because of the predicted weather forecast, the Wildflower Center was pretty empty. We were at the Wildflower Center for almost four hours and only saw about 20 people.

We made sure we took care to follow the warning on this sign.
"share space with rattlesnakes"
The boys were super excited to hit the mile long loop trail to discover the fort areas of Fortlandia. According to the brochure Fortlandia has "10 unique forts designed and built by local architects, designers, students, and artists. These creative spaces will transport you to imaginary worlds and spark an appreciation for art and nature - and the curious, wonderful ways in which they intersect."
The Keep was the first fort we came across. It was made with baling wire and juniper sticks. The boys felt like they could make something like this by themselves.
The Grand Oak Mission was a small fort made out of oak planks and circular log cuts. The boys spent more time looking at the beetles on the ground than they did interacting with this fort. The boys could not understand how the Listening Fort could be considered a fort. It was a space under some trees with a couple of brass horns and picnic tables. They thought Fort Playwire was interesting. You could walk inside the neon circles of wire but a sign stated "No Climbing". They were ready to move on to the next area.
Blanket Fort was in their Top 3 list. It had three tarps stretched over a metal frame with wooden floors. It looked really neat. There was also a great climbing tree surrounding the fort that the boys had fun playing on.
Foam Follies Fort was the first space we came to where you could build your own fort. I love the first pic in this collage where they are both scratching their heads trying to figure out what they want to build. They started with a circular fort that they could walk inside. Then they decided to use every single foam piece in their structure. It was quite a balancing act. The foam pieces felt like they were made of memory foam. They were very squishy and wobbly.  I think the boys had as much fun destroying their structure as they did building it. We probably spent 30 minutes at the Foam Follies Fort.
By the time we arrived at the Seedling Pods fort, the sun was shining brightly. The pods did not offer much shade so we looked at them and quickly moved on. There was a toy building set inside one of them and a game of rug checkers in another one. The boys thought Fort Playhive looked like it was made with giant Jenga blocks. It was in a nice shady spot. We stopped for a bit and had a snack before moving on. The Rainbow room had an upright piano in it.
Along the trail were a couple of spots with different types of swings. It was nice to play in the shade.
My absolute favorite spot was Fort Build. This was amazing! It was the 11th fort area. The other 10 areas were created by designers, this was a build your own thing area. It had bamboo poles, tree stumps, tree disks, cut railroad ties, hay bales, sticks, tarps, movable benches, ropes, and logs to be used to build whatever you wanted to build. I would seriously love to have this in my backyard. We stayed in this area for about an hour. I think three other families stopped by during that time. I was surprised this area only held their kid's interest for about five minutes before they went on to the next fort area.
Boogs decided to use bamboo, tree logs, and a small tarp for his fort.
W made a tall circular fort with railroad ties then added a bamboo roof. Later he put a tarp over the entire structure. Boogs split a piece of bamboo to make a sword and poked at W through the open spaces in W's fort.
Boogs put a gate across the entrance of his fort and made a fire pit adjacent to the main structure.
The Nomadic Forts were the last forts we saw. They were built in the middle of a beautiful meadow. The boys climbed in all of them, even in the teeny tiny one.
I was looking out through the window opening in the largest structure when Boogs decided to perch on my window like a bird. These structures were made with rebar and tree boughs.

Here are the descriptions for each fort. Click each group to enlarge.
 
We had a wonderful time exploring Fortlandia. It opened on September 29th and will be available to tour until February 24, 2019.  I'm glad we went this weekend, so close to when it first opened. I'm sure some of the forts will look a bit worse with wear and tear and weathering by the time Fortlandia ends in February.

We had a late lunch at the Center's cafe. This was a spectacular way to spend a Saturday. The boys were hot and ready to leave after lunch, so we did not get a chance to explore the rest of the Wildflower Center. It started raining as we were walking to our car in the parking lot. Perfect timing.

This post is linked to:

Country Kids linky